Battle of Dupplin Moor facts for kids
Quick facts for kids Battle of Dupplin Moor |
|||||||
|---|---|---|---|---|---|---|---|
| Part of the Second War of Scottish Independence | |||||||
|
|||||||
| Belligerents | |||||||
| Bruce loyalists | Balliol supporters English allies |
||||||
| Commanders and leaders | |||||||
| Donald, Earl of Mar † Robert Bruce † Duncan, Earl of Fife |
Edward Balliol Henry Beaumont |
||||||
| Strength | |||||||
| 15,000 to 40,000 | 1,500 | ||||||
| Casualties and losses | |||||||
| High | 35 killed | ||||||
| Designated | 21 March 2011 | ||||||
| Reference no. | BTL8 | ||||||
The Battle of Dupplin Moor was fought between supporters of King David II of Scotland, the son of King Robert Bruce, and English-backed invaders supporting Edward Balliol, son of King John I of Scotland on 11 August 1332. It took place a little to the south west of Perth, Scotland, when a Scottish force commanded by Donald, Earl of Mar, estimated to have been stronger than 15,000 and possibly as many as 40,000 men, attacked a largely English force of 1,500 commanded by Balliol and Henry Beaumont, Earl of Buchan. This was the first major battle of the Second War of Scottish Independence.
The First War of Scottish Independence between England and Scotland ended in 1328 with the Treaty of Northampton, recognising Bruce as king of Scotland, but the treaty was widely resented in England. King Edward III of England was happy to cause trouble for his northern neighbour and tacitly supported an attempt to place Balliol on the Scottish throne. Balliol and a small force landed in Fife and marched on Perth, the Scottish capital. A Scottish army at least ten times stronger occupied a defensive position on the far side of the River Earn. The invaders crossed the river at night via an unguarded ford and took up a strong defensive position.
In the morning the Scots raced to attack the English, disorganising their own formations. Unable to break the line of English men-at-arms, the Scots became trapped in a valley with fresh forces arriving from the rear pressing them forward and giving them no room to manoeuvre, or even to use their weapons. English longbowmen fired into both Scottish flanks. Many Scots died of suffocation or were trampled underfoot. Eventually they broke and the English men-at-arms mounted and pursued the fugitives until nightfall. Perth fell, the remaining Scottish forces dispersed and Balliol was crowned king of Scotland.
Contents
Background
The First War of Scottish Independence between England and Scotland began in March 1296, when Edward I of England (r. 1272 – 1307) stormed and sacked the Scottish border town of Berwick-upon-Tweed as a prelude to his invasion of Scotland. After the 30 years of warfare which followed, the newly-crowned 14-year-old King Edward III was nearly captured in the English disaster at Stanhope Park. This brought his regents, Isabella of France and Roger Mortimer, to the negotiating table. They agreed to the Treaty of Northampton with Robert Bruce (r. 1306 – 1329) in 1328, recognising Bruce as king of Scotland. The treaty was widely resented in England and commonly known as the turpis pax, "the cowards' peace". Some Scottish nobles, refusing to swear fealty to Bruce, were disinherited and left Scotland to join forces with Edward Balliol, son of King John I of Scotland (r. 1292 – 1296), whom Edward I had deposed in 1296.
Robert Bruce died in 1329 and his heir was 5-year-old David II (r. 1329 – 1371). In 1331, under the leadership of Edward Balliol and Henry Beaumont, Earl of Buchan, the disinherited Scottish nobles gathered in Yorkshire and plotted an invasion of Scotland. Edward III was aware of the scheme and officially forbade it, in March 1332 writing to his northern officials that anyone planning an invasion of Scotland was to be arrested. The reality was different, and Edward III was happy to cause trouble for his northern neighbour. He insisted Balliol not invade Scotland overland from England but turned a blind eye to his forces sailing for Scotland from Yorkshire ports on 31 July 1332. The Scots were aware of the situation and were waiting for Balliol. David II's regent was an experienced old soldier, Thomas Randolph, Earl of Moray, who was appointed to the role of guardian of Scotland. He had prepared for Balliol and Beaumont, but he died ten days before they sailed.
Prelude
Balliol's force was small, only 1,500 men: 500 men-at-arms and 1,000 infantry, the latter mostly longbowmen. He anticipated being joined by many Scots once he had landed. While they were underway, the Scots selected Donald, Earl of Mar, as the new guardian. Mar was an experienced campaigner and a close blood relative to David. He divided the large Scottish army: Mar commanded the part north of the Firth of Forth, while Patrick, Earl of March, commanded those to the south. Balliol had been in communication with Mar and hoped he would come over to his side with many of his troops. Knowing Mar to be commanding the troops on the northern shore of the firth, Balliol landed there, at Wester Kinghorn (present day Burntisland), on 6 August 1332.
While the invaders were still disembarking they were confronted by a large Scottish force commanded by Duncan, Earl of Fife, and Robert Bruce (an illegitimate son of King Robert the Bruce). The Scots attacked the part of the English force on the beach, but were driven off after a hard-pressed assault by the fire of the English longbowmen and by their supporting infantry before Balliol and Beaumont's men-at-arms could get ashore.
Scottish accounts of the time dismiss their losses as trivial, while one English source gives 90 Scots killed, two give 900, and a fourth 1,000. One chronicle, the Brut, reports that Fife was "full of shame" at being defeated by such a small force. There is no record of the casualties suffered by Balliol's men. Mar withdrew his main force to the capital, Perth, amalgamated the survivors of Kinghorn and sent out a general call for reinforcements. Buoyed by their victory, Balliol and Beaumont's force completed their disembarkation and marched to Dunfermline, where they foraged, looted a Scottish armoury and then headed for Perth.
Battle
English approach
The Scottish army under Mar took up a position on the north bank of the River Earn, 2 miles (3 km) south of Perth, and broke down the bridge. The Scots were enormously stronger than the English. Chronicles of the time give strengths of 20,000, 30,000 or – in seven cases – 40,000. The historian Clifford Rogers guesses they numbered something more than 15,000. Nearly all of the Scots were infantry. The English arrived on the south bank of the Earn on 10 August. They were in a difficult position: in enemy territory, facing an army of more than ten times their number in a good defensive position across a river and aware that the second Scottish army, under March, was moving towards them. The Scots were content to rest in their defensive positions, while planning to send a portion of their army on a wide outflanking manoeuvre the next day. Any attempt by the English to force the river would clearly have been foredoomed. The English may have been hoping Mar would desert to their cause, but he gave no indication of doing so. The two forces faced each other across the river for the rest of the day.
The Scots were so confident of victory that some started their celebrations that evening, according to a contemporary source "playing, drinking and making merry" late into the night. A guard was set by the broken bridge, but otherwise no precautions were taken against any action by the English. Realising they had no hope if they either retreated or remained where they were, the entire English force forded the river at an unguarded spot. Advancing in the dark, at about midnight they stumbled upon a Scottish camp and attacked it. Those Scots who were not killed or captured fled. The English believed they had overcome the main Scottish force, but were disabused at dawn when they saw the Scots advancing against them in two large bodies. This revelation demoralised the English, but according to the chronicles they were given heart by a stirring speech from one of their leaders.
The English arrayed themselves for battle on foot, except for 40 German mercenary knights who fought mounted. The other men-at-arms formed up in three tightly-packed ranks with a fourth rank of ordinary, pike equipped, infantry. The longbowmen were divided and assigned to each side of this central group. They were positioned where a valley narrowed as it entered hilly terrain. The infantry occupied the centre of this valley where it was about 600-foot-wide (180 m) with the archers on higher and rougher terrain on each side, possibly echeloned forward. The horses of the men-at-arms were kept to the rear.
Scottish attack
The Scots were still supremely confident and formed up in two large groups or battles - also referred to as schiltrons. These were tightly packed, deep, pike-armed formations. Mar suggested that the English be given the opportunity to surrender, in which case they could have been ransomed, which would have raised a large sum. On seeing the English across the Earne, Bruce, who was in command of the leading schiltron, and who was aware, at least in part, of Mar's correspondence with Balliol, publicly claimed that this unopposed crossing was due to treachery by Mar. Mar denounced this as a lie and declared he would prove his loyalty by being the first to strike a blow against the English. Bruce claimed this honour for himself and the two Scottish schiltrons proceeded to race each other to strike the opening blow against the English.
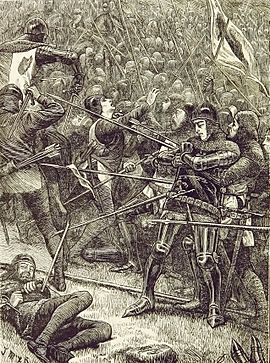
Bruce's schiltron, being already in the lead, won the race. But its headlong charge disorganised it and left the slower men behind. When it contacted the English only 800 men were still with Bruce, but they struck with such force that they drove the infantry in the English centre back nearly 10 yards (9 m). The English did not break, but turned their shoulders to the Scots, braced themselves and halted the Scottish onrush. The Scots in their haste had allowed themselves to be channelled by the terrain and all of them attacked the English men-at-arms in the centre, ignoring the longbowmen on the valley sides. Pushing back the English centre had the paradoxical effect of exposing their flanks to these bowmen. The rest of Bruce's schiltron followed him into the valley, pressing their comrades in front of them forward against the English so strongly that the front ranks of neither force were able to use their weapons.
The Scots were either largely without helmets, or wore helmets without visors (face guards), for contemporaries noted that the English archers "blinded and wounded the faces" of those in the leading schiltron. Harassed by this fire, the Scots on the flanks pressed closer to their main body, further compressing it and hampering the freedom of movement of its members. Mar's schiltron, which was also rushing towards the English, became disorganised due to its haste and was similarly channelled by the steep valley sides. They charged into the rear of Bruce's formation, causing chaos. The struggle continued from a little past dawn until after noon. In the centre of the Scottish mass the result was literally suffocating; men were pressed too tightly together to be able to breathe and any who lost their footing were trampled to death. Contemporary accounts speak of more than a thousand Scots being smothered without coming into contact with the English.
The English, being in a looser and less deep formation, were more able to use their weapons, once they had withstood the initial onslaught. The survivors of Bruce's schiltron attempted to extricate themselves, adding to the confusion and making easy targets for the English men-at-arms. The chronicles record the English infantry having to climb over heaps of dead Scots in order to be able to strike at those still living. All the while the longbowmen maintained their fire into the Scottish flanks. Eventually the Scottish resistance collapsed and they routed. Several of the surviving Scottish nobles made their escape on horseback; the rest of the Scots fled on foot. The English men-at-arms mounted their own horses and pursued the Scots, hacking them down until sunset. The English then occupied Perth and set to work on improving its fortifications, against the anticipated arrival of March's army.
Casualties
Precise figures for the English dead are available: they lost 35 men-at-arms: 2 knights and 33 squires. Several accounts stress that not a single English archer was killed. The losses among the Scots are less certain, but all accounts agree they were very heavy. Mar and Bruce died on the field; as did 2 other earls, 14 barons, 160 knights and a large number of less notable men. Of the contemporary accounts which estimate the number of Scottish dead, two English chronicles give more than 15,000. Two Scottish accounts variously record 2,000 or 3,000 dead, while a third specifies 3,000 "nobles" and "of other men an untold number". Most accounts refer to the Scottish dead lying in great heaps, some taller than a spear's length. The only high-ranking Scottish survivor was the Earl of Fife, who was captured and changed sides.
Aftermath
A week after the battle, March arrived outside Perth, having added the remnants of Mar's army to his own force. There was little he could do. Given that Balliol had defeated Mar in open battle, it would have been folly for March to assault him in a fortified town. Balliol had captured plentiful supplies of food in Perth and the ships which had landed his army defeated the Scottish navy, enabling food and reinforcements to be shipped in. In any event, before long the Scottish host had exhausted its own supplies, stripped the surrounding countryside of food and disbursed.
Balliol was crowned king of Scotland at Scone – the traditional place of coronation for Scottish monarchs – on 24 September 1332. Almost immediately, Balliol granted Edward III Scottish estates to a value of £2,000, which included "the town, castle and county of Berwick". Balliol's support within Scotland was limited and within six months it had collapsed. He was ambushed by supporters of David II at the Battle of Annan a few months after his coronation. Balliol fled to England half-dressed and riding bareback. He appealed to Edward III for assistance. Edward III dropped all pretence of neutrality, recognised Balliol as king of Scotland and made ready for war. After the defeat of the Scots at the Battle of Halidon Hill in July 1333 Balliol was reinstated on the Scottish throne. He was deposed again in 1334, restored again in 1335 and finally deposed in 1336, by those loyal to David II. The Second War of Scottish Independence which had started with Balliol's invasion finally ended in 1357.
In his classic study, A History of War in the Middle Ages, Sir Charles Oman says: "The Battle of Dupplin formed a turning point in the history of the Scottish wars. For the future the English always adopted the order of battle which Balliol and Beaumont had discovered."
Location
Historic Environment Scotland has identified a site on Gaskmoor, which it suggests corresponds with the accounts in the chronicles. This is on the Dupplin plateau, south east of Dupplin Loch, and 5 miles (8 km) south west of Perth. It points out that if correct
The sides of the valley, and the narrowing of the valley, would have pushed the wings of the schiltrons into the centre, bunching the Scots and creating the deadly crush that appears to have been the main cause of the disaster. The steep slopes would have given a great deal of protection to the [English] from any flanking moves. The width of the valley would accommodate 500 or so dismounted men-at-arms, while the western end of the valley opens out; this is where the Scots would have started, and it would not have been immediately obvious that the topography was a funnel for them.
and concludes that this choice of terrain "is evidence of the tactical brilliance of the [English], who were battle-hardened veterans." Historic Environment Scotland added the battlefield to the Inventory of Historic Battlefields in Scotland in 2011.
See also
 In Spanish: Batalla de Dupplin Moor para niños


