Second Battle of Heligoland Bight facts for kids
Quick facts for kids Second Battle of Heligoland Bight |
|||||||
|---|---|---|---|---|---|---|---|
| Part of the First World War | |||||||
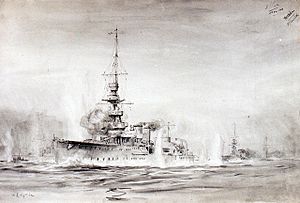
 HMS Calypso at the battle, during which she was severely damaged, drawn by William Lionel Wyllie |
|||||||
|
|||||||
| Belligerents | |||||||
| Commanders and leaders | |||||||
| Strength | |||||||
| 3 battlecruisers 8 light cruisers 10 destroyers |
2 battleships 4 light cruisers 8 destroyers 14 minesweepers |
||||||
| Casualties and losses | |||||||
| 22 men killed, 43 wounded 1 light cruiser damaged |
21 men killed, 40 wounded, 22 prisoners of war 1 minesweeper sunk 1 light cruiser damaged |
||||||
The Second Battle of Heligoland Bight, also the Action in the Helgoland Bight and the Zweite Seeschlacht bei Helgoland, was an inconclusive naval engagement fought between British and German squadrons on 17 November 1917 during the First World War.
Contents
Background
British minelaying
The British used sea mining defensively to protect sea lanes and trade routes and offensively to impede the transit of German submarines and surface ships in the North Sea, the danger of which was illustrated on 17 October 1917 by the sortie of the German Brummer-class cruisers SMS Brummer and SMS Bremse (the action off Lerwick) against the Scandinavian Convoy. (During 1917, six U-boats were sunk by British mines and in two years, the German minesweeping counter-effort suffered the loss about 28 destroyers and 70 minesweepers and other ships.)
The Germans had been forced into minesweeping up to 150 nmi (170 mi; 280 km) into the Heligoland Bight and in the southern Baltic Sea, covered by light cruisers and destroyers, with occasional distant support by battleships. After the action off Lerwick, several proposals for attacks on the German minesweepers and escorts were canvassed at the Admiralty. On 31 October, the British sent a large force of cruisers and destroyers into the Kattegat, which sank Kronprinz Wilhelm, an armed merchant ship and nine trawlers.
German test trips
The prolific British laying of mines and net barrages outside the main German mine belts between Horns Reef and Terschelling, close to the bases of the High Seas Fleet (Hochseeflotte) forced the Kaiserliche Marine into surveying the British minefields, to find routes through them for transit into and back from the North Sea. Test trips were carried out, being substantial operations with ships to find the mines, minesweepers, torpedo boats (usually a continental term for destroyers), U-boats, barrier breakers and light cruisers, with air reconnaissance by Zeppelins and seaplanes. The Test trips were also protected by battleships on routes known to be free of mines.
Prelude
North Sea operations
On 20 October, the British code breakers of Room 40, part of the Naval Intelligence Division of the Admiralty, decrypted orders to the submarine UB-61 to scout to the north of Bergen to find the new route of the Scandinavian Convoy. Agent reports from Copenhagen disclosed an imminent German attack by seven light cruisers and 36 destroyers. During the week ending 11 November, British light cruisers, destroyers and a battlecruiser escort, conducted an abortive sweep along the fringe of the Heligoland Bight minefields. By mid-November the Admiralty had obtained enough intelligence to intercept one of the big German minesweeping operations, provided that the ships based at Rosyth, in Scotland, could sail in time. The Admiralty decided that an offensive operation should begin on 17 November.
Test trip, 17 November

The Germans planned a Test trip for 17 November 1917, comprising the 2nd and 6th Auxiliary Mine Sweeper Half-Flotillas, the 12th and 14th Torpedo Boat Half-Flotillas, Barrier Breaking Division IV and light cruisers of Scouting Group Division II, commanded by Rear-Admiral (Konteradmiral) Ludwig von Reuter from the 6th Mine Sweeper Half-Flotilla. The Kaiser-class battleships, SMS Kaiser and SMS Kaiserin from Squadron IV, each with ten 12 in (300 mm) guns, led by Captain (Kapitän zur See) Kurt Graßhoff in Kaiserin, were to act as covering force for the group. The battleships were to reach a point west of Heligoland by 7.00 a.m. while the Test trip group rendezvoused in the Heligoland Bight about half-way between Horns Reef and Terschelling. With poor weather grounding Zeppelins and making it impossible for light cruisers embark seaplanes, after they had alighted on the sea, the Test trip relied on reconnaissance patrols by two land-based seaplanes from Borkum on the German coast, just east of the Netherlands, for reconnoitring ahead of the group.
British plan

The German Test trip had been revealed by the code breakers of Room 40, allowing the British to plan an ambush. On 16 November, orders for an attack on the Test trip were sent to Admiral Sir David Beatty, Commander-in-Chief of the British Grand Fleet. On 17 November 1917 a force of cruisers under Vice Admiral Trevylyan Napier was sent to attack the German minesweepers as they were mineweeping.
Battle
The action began at 7:30 a.m., roughly 65 nmi (75 mi; 120 km) west of Sylt, when Courageous sighted German ships. She opened fire at 7:37 a.m. Reuter advanced with four light cruisers and eight destroyers towards the British ship to cover the withdrawal of the minesweepers, with all but the trawler Kehdingen (1906), escaping the British detachment. A stern chase ensued as the German forces, making skillful use of smokescreens, withdrew south-east at their best speed, under fire from the 1st Cruiser Squadron, the 1st Light Cruiser Squadron and the 6th Light Cruiser Squadron. Repulse was detached from the 1st Battle Cruiser Squadron and came up at high speed to join the battle. Both sides were hampered in their manoeuvres by the presence of naval minefields.
At about the same time, the light cruisers came under fire from Kaiser and Kaiserin, Kaiser-class battleships, which had come up in support of Reuter's ships; Caledon was struck by a 30.5 cm (12.0 in) shell, which damaged a gun turret; shortly afterwards, the British ships gave up the chase as they reached the edge of more minefields. A shell went through the upper conning tower of the light cruiser Calypso, killing the conning tower crew and mortally wounding the Captain, Herbert Edwards, on the bridge and knocking unconscious the navigator, Lieutenant-Commander M. F. F. Wilson. All personnel on the lower bridge were killed and the gunner officer, Lieutenant H. C. C. Clarke took command, which was made more difficult because the shell also cut all electrical communications and reduced the rate of fire. The battlecruiser Repulse briefly engaged the German ships at about 10:00 a.m., achieving a hit on the light cruiser SMS Königsberg that started a serious fire.
Aftermath
Casualties
In 1920, Admiral Reinhard Scheer wrote that the Germans suffered casualties of 21 men killed, ten seriously wounded and thirty men slightly wounded. An Admiralty communiqué listed British casualties as one officer and 21 men killed, four officers and 39 men wounded; 22 prisoners were taken.
Victoria Cross
Able Seaman John Carless of Walsall, aboard Commodore Cowan’s flagship Caledon, was awarded a posthumous Victoria Cross for his bravery in continuing to load and fire his gun despite receiving mortal shrapnel wounds that opened his abdomen.
Orders of battle
British forces1st Cruiser Squadron
6th Light Cruiser Squadron
1st Light Cruiser Squadron
1st Battle Cruiser Squadron (detachment)
Other forces at sea in support (none of which engaged)
|
German forces2nd Scouting Group
7th Torpedo-Boat Flotilla
Minesweepers
4th Battle Squadron (detachment)
Other forces at sea in support (none of which were engaged)
|

